I’m sorry for the lack of blogging lately. We’ve got several projects in the pipeline and that’s leaving us little time to blog. So I’ll be filling in with a few older blog posts which are now buried in the archives yet still worth a read. This post was originally published April 4, 2006.
At the recent training seminars, I told the attendees that there was one keyboard shortcut which they absolutely had to learn. By the end of the day, I had repeated it so much that I doubt any of them will ever forget it. Learn this one key-combination, and you’ll unlock a world of power that you may never have realized was there. Are you ready for it? Here it is . . . command-T.
Honestly, we’ve tried hard not to keep command-T a secret, and you may even have used it occasionally. This key-command always applies to the very first item in the Display menu: Set [Window Name] Display…
The words “Window Name” in brackets are meant to indicate that the name of this command will change depending on which type of window you’re looking at. If you’re looking at the text of the Bible, the first item in the Display menu reads Set Text Pane Display. If you’re looking at the Analysis tab in the Details workspace, this command will read Set Analysis Display. If you’re looking at a Map window, it will read Set Map Display. And so on down the line. Any time you want to see if there are formatting options or other ways to customize the display of information, give command-T a try and see what you get.
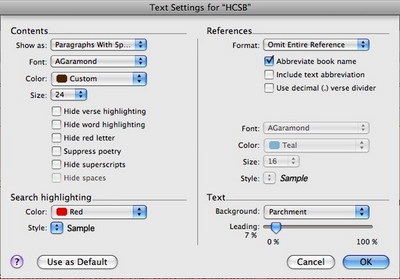
As I just mentioned, when looking at the text of the Bible, command-T invokes the Set Text Pane Display dialog. That’s where the “T” comes from: it originally gave you options for changing the appearance of the text of the Bible. Want to change the font, size, style, or color of text? Want to display the text as continuous paragraphs rather than as separate verses? Want to make the text of the references smaller, italicized, and superscripted? Want to remove the references altogether? You can do all that and more with the Set Text Pane Display dialog.
Why is it called the Text Pane Display? Because the changes you make here apply to whichever pane of a Search window you have selected. Thus, if you have a Search window with panes containing the ESV, the Message, and the New Living Translation, the Set Text Pane Display dialog will only apply to one of these panes. The active pane is the one which is bounded by a blue selection box. Let’s say for purposes of this discussion that the pane containing the ESV is selected.
When you make your appearance changes in the dialog box and click OK, those changes will apply only to the pane containing the ESV. What’s more, they will only apply temporarily. If you open another pane containing the ESV, it will appear in the default display format. To have your custom appearance settings apply every time you open the ESV, you need to click Use as Default in the dialog box before you click OK. (You can also set the default appearance for all your Bibles in the Text Display section of the Preferences.)
Okay, by now you can see that command-T comes in handy when you need to customize the appearance of Bible text, but it hasn’t exactly unleashed all the power I talked about it the first paragraph of this post. We’ll save some of that for our next post, in which I’ll discuss command-T in connection with the Details Workspace.


